Hello!
I have recently had unknown issues with my Macbook Pro 13 Early 2011 which, at this current moment, makes my MacOS X partition unusable. So, in the meantime, I’m running Ubuntu 16.04 as my main partition and its wonderful.
I have noticed that getting it to work relatively seamlessly was quite a bit more tricky than I hoped. There seems to be a lot of scattered information but not many one stop articles to make it useable. To me useability involves it having a decent battery life and running relatively cool. I hope this will help.
These instructions are specific to a Macbook Pro but are mostly reusable for other devices.
Get Color Options from MacOSX (optional)
If you still have a distribution of MacOSX on your machine, you are in luck because you will have a necessary .icc file to make your screen look nice. We will obtain this now. You will need an external drive or something like Dropbox for this (I will show you instructions for Dropbox). Therefore do the following:
- Boot up your MacOSX
- Open a terminal window by pressing
command + spacebarand typing “Terminal” and selecting the first option. You should now see a terminal window similar to a unix terminal. -
You will need to look for your
.iccfile. In terminal, type the followingcp /Library/ColorSync/Profiles/Displays/*.icc /your/destination/location
You can also find the location of the .icc file using “Profiles” as per these instructions (note this is Yosemite instructions, YMMV).
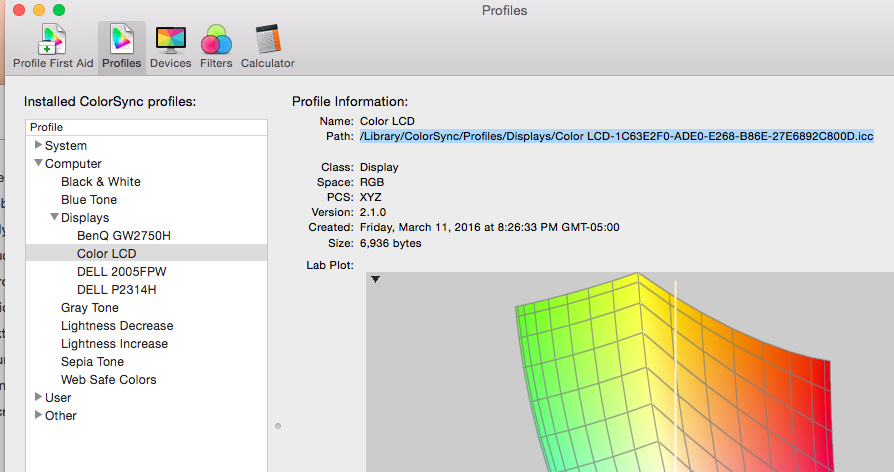
This will copy everything over to your backup location. For me that was Dropbox so my destination folder was ~/Dropbox/ but YMMV with that. Now you should have a backup of your color profile.
Bootable Ubuntu iso
First thing first, you need a distribution of Ubuntu on a CD. Right now I use Ubuntu 16.04.1 however these instructions should be universal for any Debian distro. You should download the Desktop distribtuion iso on the Canocial website and burn it to either a CD/DVD or put it on a USB stick. Your options are as follows:
- From Windows OS, create bootable DVD/CD
- From Windows OS, create bootable USB
- From MacOSX, create DVD/CD
- From MacOSX, create Bootable USB
Dual Boot (optional)
Generally you’ll probably want to dual boot so you have MacOSX on one partition and Ubuntu on another. This is actually recommended since, as of the time of writing, the only way to get firmware and some security updates is through MacOSX. If you want to dual boot I will defer you to these instructions on HowToGeek which worked nicely for me in the past. I wont re-describe them here for interest of conciseness.
Notes
- This step is optional in the sense that you are free to single boot Ubuntu (ie. no MacOSX). I’m running this right now. In this case, you don’t need rEFInd and can skip this step. I will assume this single boot for the remainder of this article.
- You can likely get away without using rEFInd but YMMV with this. It may require you to press
altat every boot to get into Ubuntu (since you’ll be using the Apple defaults). The partition should show up as “Windows” at the boot screen. I haven’t actually experimented with this so I cannot speak personally about this.
Installation of Ubuntu
So assuming your Macbook has no existing installation of MacOSX, you may simply pop in your bootable CD/DVD/USB and follow the on screen options. Some notes about the installation follow:
- You may be asked to replace the existing firmware interface with UEFI or not. I did not do that, as I want to keep as much of the original MacBook configuration as possible. I think this causes longer bootup times as upon boot the computer looks for MacOSX, fails to find it then defaults to Ubuntu. But if you ever do install MacOSX again it should make your life easier.
- Its a good idea to plug in a ethernet cable into your device. This allows you to do updates and get latest drivers for wireless (ie. wifi). This isn’t strictly necessary (I believe the correct wifi drivers install regardless) but certainly helps save time.
- You should be free to overwrite any MacOSX installation there is present (assuming you indeed only want Ubuntu). You may have to partition your drive or delete existing partitions. Google is your friend when in doubt.
Getting macfanctld
So now you should have a working installation of Ubuntu congrats! Now we get to nitty gritty things which improve your experience. First order of business: you may notice your laptop is hella-hot but the fan isn’t spinning much. We will fix that here:
- Open a terminal window by pressing
control + alt + T. - Type the following:
sudo apt install macfanctld -y - Press
yif prompted - Behold how your fan gets louder (it may not be perceptible if your computer isn’t hot though)
This utility is nice because its set and forget. With this utility managing your fan, your computer will run cooler and respond better to high CPU loads. Hopefully your computer wont fry itself now!
Optional sensors
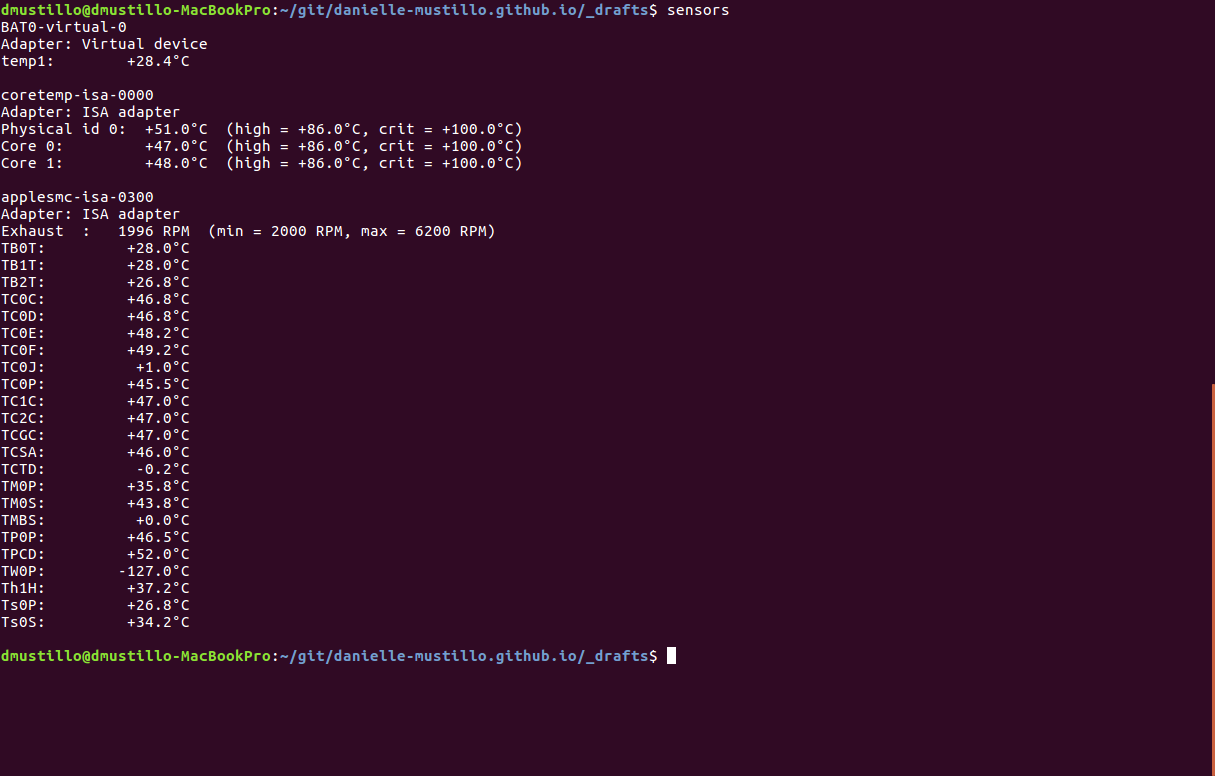
If you are curious about the temperature of your computer, you may get sensors which reports the temperature of various devices on your machine. I find my CPU runs around 60 celcius (hot I know). To get sensors type the following into your terminal window:
sudo apt install lm-sensors -y
sensors
The first command installs sensors, the second command will print something like this:
Power Management
If you wish to save battery, I found there are two main ways to do that. The first is described here and although it is more custom, it is safer. To do that type:
sudo apt install powertop -y
sudo powertop
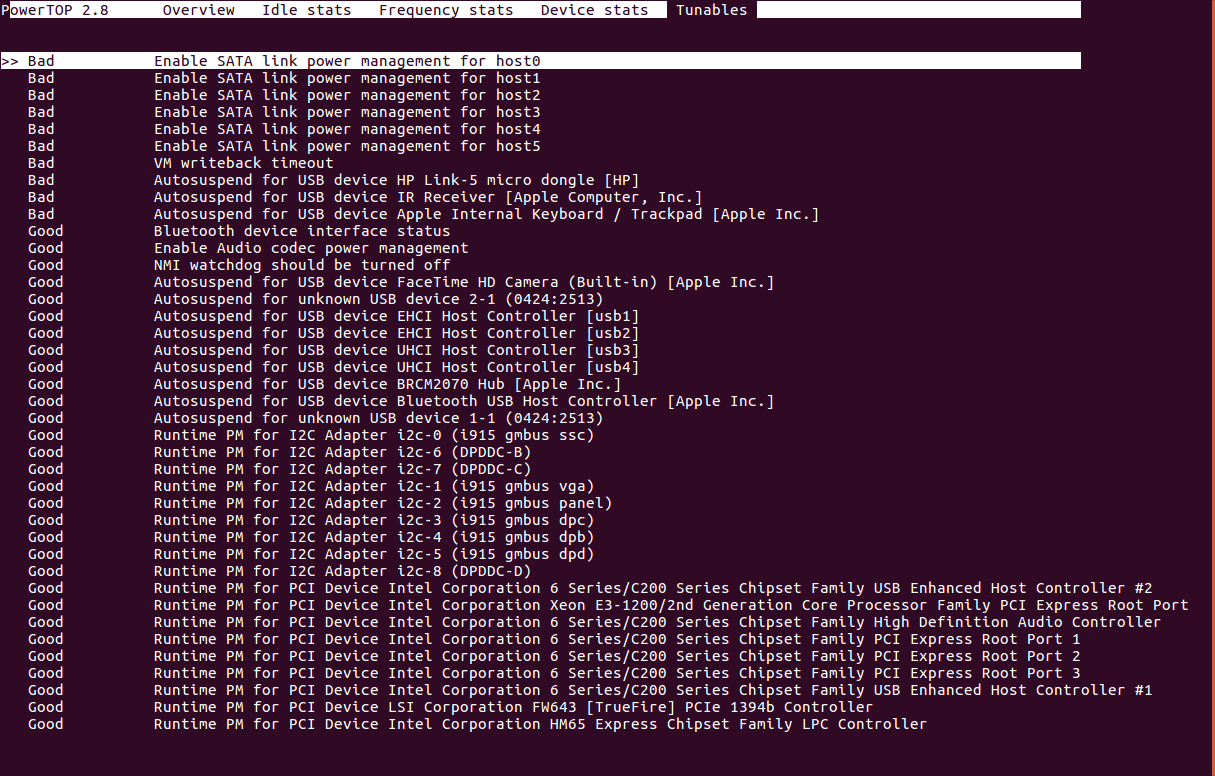
You will now be prompted with text menu. This program is interesting because it lets you see what is using power the most, which helps diagnose poor battery life. For our purposes however, we will press tab until were at the “Tunables” menu. You will likely notice that most items here are labeled “Bad”. We will want to set these all to “Good” by pressing Enter on each option (arrow keys to move up or down). To save press esc.
Now try your machine. You will be in one of following two camps.
(Case 1) No Problems with Power Management
If it is useable and there are no odd issues that cropped up all of a sudden (usb ports work OK, trackpad is OK, etcetera), you can proceed to install tlp which will automate a lot of power concerns for you. Do the following:
sudo apt install tlp -y
sudo tlp start
This generally will work well for most people. TLP is a program designed for thinkpad but interestingly works very well for most devices including my Macbook. It starts on boot, so if it works for you it will be a set and forget option.
(Case 2) Power Management Problems
This gets more complicated.
If there are issues, you should restart your computer and systematically find which option is bad by going through powertop and guess what option is causing problems. A good way is by doing a sort of binary search for the options causing you problems. This may be annoying but is worth it. In my case, I had the following options mess up my computer:
Enable SATA link power management for host0
Enable SATA link power management for host1
Once you found which ones are messing you up, you will want to do one of the following:
(Case 2.1) Solving Problems the Safe Way
This isn’t the best way to solve your power management problems, but it is less risky. The better option will follow.
- Restart your Macbook again
- Once restarted, type into a terminal
sudo powertop --html - Find the generated
powertop.htmlfile in the current directory. Typinglsin your terminal will do that. - Type
firefox powertop*.htmlto open the file. - Type
sudo apt install gksu -y. - Type
gksu gedit /etc/rc.localto open a editor with commands to run on start up. - In Firefox, navigate to the “Tuning” tab, and copy all of the
echocommands that work (ie. skip the powertop options that caused the odd behaviour) into your opened editor window. Make sure these commands are before the line which readsexit Xwhere X is a number. - Save the file in the editor window and reboot.
You should now have those power settings applied at reboot. This has the disadvantage of being the least customizable, as each option is applied through reboot only.
(Case 2.2) More Advanced Option (better, but tedious)
Skip this if you did the above step.
If you want to solve your power management problems in the best way possible, this way is for you. These steps vary depending on your situation. Don’t try this unless you are willing to restart and have reasonable confidence in what you are doing. The safe way is the previous section.
If you are brave, you can install tlp as documented in the next section, but before typing sudo tlp start, you disable the power option that messes you up. To do that, you would need to find that option here, disable that option as documented then start tlp. For me, that option which messed up my computer was this option being set to min_power (it needed to be max). Since the potential problems are limitless, this is out of the scope of this article. However, this is worthy of note because it is by far the best option.
Washed out Colors
You may notice your colours are slightly washed out. Assuming you have saved your .icc files, you can load those colour profiles in this section. If you don’t have .icc files you can skip this part or find some online. Either way, do the following:
- Press
commandand typesystem settings. Select the only option. - Navigate to
Device Colour Profilesand select your screen (should be labeled something likeApple-MacBookPro8,1). ClickAdd profile. - In the dropdown, select
Other profile...then navigate to your saved.iccfile. You will have to plug in your external drive or download the files from Dropbox to do this. Once selected, clickAdd. - If you have multiple
.iccfile do this for each. - Once you loaded all your
.iccs, double click each profile and select the one you find looking best.
Your greys should look much better now!
Tap to Click
Almost done!
I noticed that the tap to click option on the Trackpad doesn’t behave well often. If you find it annoying, you can disable that by doing the following:
- In
System Settings, clickMouse & Touchpad - Disable the ticked option
Tap to click.
While your here, you can play with other options. Close the window when your done.
Conclusion
You should now have a Ubuntu distribution on your computer that is not only snappy but also battery efficient and looks good. If you have a retina display you may need to do other options as found here but as I do not have a retina display YMMV with these instructions. Here’s the finished product: